Succulent Leaf Propagation: Growing New Plants from Single Leaves
Which Leaves Actually Root (and Which Just Rot)
Leaf propagation works reliably on rosette-forming succulents with thick, fleshy leaves that snap off in one clean piece: Echeveria, Graptopetalum, Sedum, Pachyphytum, and most Graptoveria hybrids. It does not work well on Haworthia, Aloe, Gasteria, or most Kalanchoe — their leaves will often root but almost never produce a baby plantlet, so propagate those from offsets or stem cuttings instead.
The leaf itself has to come off intact. Hold it near the base and gently wiggle side to side rather than pulling straight down. A leaf that is ready to propagate:
- Separates with a soft pop, leaving a small dimple or dry-looking scar on the stem
- Has no torn fibers or wet tissue at the point of attachment
- Is plump and firm, not soft, wrinkled, or translucent
- Comes from lower on the rosette, where leaves are mature rather than newly formed
If the base tears or a sliver of tissue stays behind on the stem, set that leaf aside. Torn leaves rot far more often than they root, so it is not worth the tray space.
Callusing: The Step Most People Rush
Before a leaf touches any soil, the cut end needs to dry into a callus — a firm, slightly shrunken seal over the wound. Skip this and the open tissue soaks up moisture and turns mushy within days. Lay leaves in a single layer on a paper towel or plate, out of direct sun, for two to five days depending on indoor humidity. Dry apartment air in winter can callus a leaf in two days; a humid summer windowsill may take five or more.
Check readiness by look rather than by the calendar: the cut end should appear dry and slightly indented, not glossy or moist. A leaf you set down at 6pm on a Monday might be ready by Wednesday morning, or it might need until Friday — the leaf tells you, the clock doesn't.
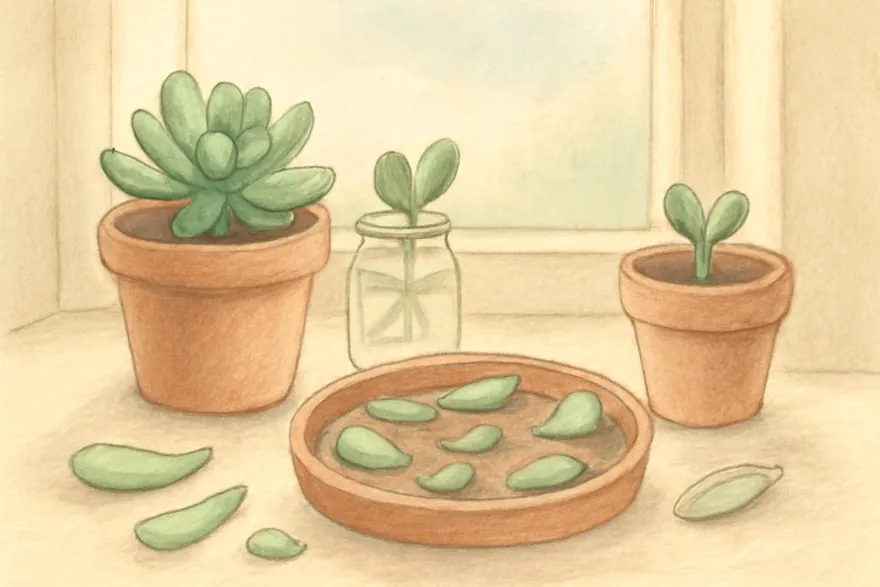
Setting Up the Windowsill Tray
Fill a shallow tray or shallow terracotta saucer with a fast-draining mix — a 1:1 blend of standard potting soil and coarse perlite, or a bagged cactus mix straight from the bag, works fine. Dampen it lightly so it holds together when squeezed but doesn't drip; bone-dry mix won't support root growth, and wet mix will rot the callused end on contact.
- Lay each callused leaf flat on top of the mix, cut end barely touching the surface — don't bury it
- Angle the tail slightly upward so it isn't lying in a puddle of condensation if you mist
- Place the tray where it gets bright, indirect light for most of the day — an east-facing sill or a few feet back from a south or west window
- Mist the surface lightly every three to four days, just enough to dampen the top quarter-inch of mix
Avoid direct midday sun on the leaves themselves for the first few weeks. A leaf with no roots yet can't pull enough water to cope with strong sun, and it will scorch — the tip turns papery and tan before anything else has a chance to grow.
What to Expect, Week by Week
Nothing visible happens for the first one to two weeks — root initials are forming inside the callused tissue, not yet poking through. Around week two or three, thin pink or white root threads emerge from the cut end and press into the mix. Roots typically show up before any sign of a new plantlet, which can be discouraging if you're checking daily, but it's normal.
A tiny rosette bud, often no bigger than a grain of rice, usually appears at the base between weeks three and five. From there it draws water and stored nutrients out of the original leaf, which slowly shrivels and browns over the next month or two. This is the part beginners get wrong most often: the mother leaf is feeding the baby, so pulling it off early — even once it looks mostly dead — starves the new plantlet before it can grow its own root system. Leave it attached until it's fully dry, papery, and detaches with the lightest touch, usually six to ten weeks after the leaf was first set down.
Common Failures and How to Read Them
Even with clean leaves and correct technique, not every leaf converts into a plant — a beginner batch typically sees somewhere between a third and two-thirds of leaves actually produce a rosette, and that's a normal, not a failed, result. A few patterns explain most of the losses:
- Leaf turns black or mushy within a week: it was buried too deep, the mix was too wet, or the leaf wasn't fully callused before contact with soil
- Roots grow but no plantlet ever forms: some leaves, especially from stressed or older plants, root without producing offsets — this is normal and not something to fix, just remove and compost the leaf once the mother leaf is fully spent
- Plantlet is pale, stretched, or leaning hard toward the glass: light is too low; move the tray closer to the window or add a small supplemental grow light for a few hours a day
- Leaf shrivels from the tip without ever rooting: it was placed in direct hot sun before roots formed, or the mix stayed bone dry for too long between mistings
Once a plantlet has three or four true leaves and a small but visible root ball, it's sturdy enough to move into its own small pot with the same fast-draining mix used for propagation — no rooting hormone, heat mat, or humidity dome required for any of this on an ordinary windowsill.